



1. URP 渲染管线与后处理架构
Unity 的 Universal Render Pipeline(URP) 是基于 ScriptableRenderPipeline 构建的轻量渲染管线,其核心设计思路是:一切渲染步骤都可以在 CPU 侧用 C# 显式编排。这与 Built-in 管线把大量逻辑固化在引擎内部有根本区别。
在后处理这个子域里,两种路径并存:
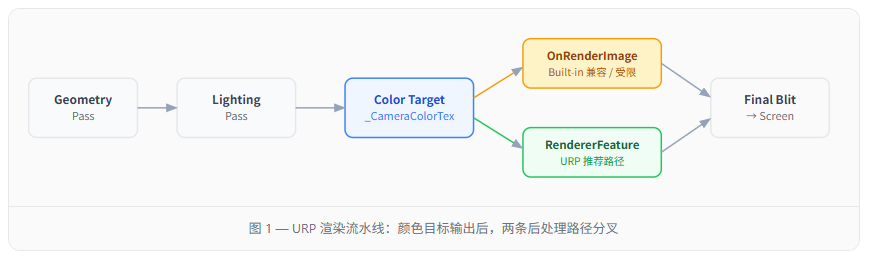
| 特性 | OnRenderImage | ScriptableRendererFeature |
|---|---|---|
| 所属管线 | Built-in / 兼容模式 | URP 原生 |
| SRP Batcher 兼容 | 不支持 | 支持 |
| 移动端 Tile-Based GPU | 额外 resolve 开销 | 可控 LoadAction |
| 访问深度/法线贴图 | 有限 | 原生支持 |
| Pass 执行时机 | AfterEverything | 可自定义任意时机 |
| 在 URP 中是否推荐 | 不推荐 | 官方推荐 |
2. OnRenderImage —— 传统路径
OnRenderImage(RenderTexture src, RenderTexture dst) 是 Built-in 管线遗留的回调。在 URP 中只有摄像机同时挂着 UniversalAdditionalCameraData 并且禁用了某些设置时才能触发,不推荐在生产项目使用,但理解它有助于迁移老项目。
最小示例:灰度滤镜
Shader "Hidden/PostFX/Grayscale"
{
  SubShader {
    // 关掉深度写入,关掉裁剪
    ZTest Always  ZWrite Off  Cull Off
    Pass {
      HLSLPROGRAM
      #pragma vertex   vert
      #pragma fragment frag
      #include "Packages/com.unity.render-pipelines.universal/ShaderLibrary/Core.hlsl"
      TEXTURE2D(_MainTex); SAMPLER(sampler_MainTex);
      struct Varyings {
        float4 posCS : SV_POSITION;
        float2 uv    : TEXCOORD0;
      };
      Varyings vert(uint vertexID : SV_VertexID) {
        Varyings o;
        // 用三角形铺满屏幕,无需顶点缓冲区
        o.uv    = float2((vertexID << 1) & 2, vertexID & 2);
        o.posCS = float4(o.uv * 2.0 - 1.0, 0.0, 1.0);
        return o;
      }
      half4 frag(Varyings i) : SV_Target {
        half4 col = SAMPLE_TEXTURE2D(_MainTex, sampler_MainTex, i.uv);
        // 人眼亮度感知权重:Rec. 709
        half luma = dot(col.rgb, half3(0.2126, 0.7152, 0.0722));
        return half4(luma, luma, luma, col.a);
      }
      ENDHLSL
    }
  }
}
using UnityEngine;
// 挂在摄像机上;URP 中需要关闭后处理堆栈或使用兼容模式
[ExecuteAlways, RequireComponent(typeof(Camera))]
public class GrayscaleEffect : MonoBehaviour
{
    [SerializeField] Material _mat;
    // 每帧在最终图像写入屏幕之前回调
    void OnRenderImage(RenderTexture src, RenderTexture dst)
    {
        if (_mat == null) { Graphics.Blit(src, dst); return; }
        Graphics.Blit(src, dst, _mat, /* passIndex */ 0);
    }
}
⚠ URP 中的限制URP 默认不执行 OnRenderImage。必须在 Universal Renderer Data 里关闭"中间纹理"选项,或直接迁移到 RendererFeature。移动端强烈建议后者,因为前者会强制 GPU 做一次额外的 Resolve。
3. ScriptableRendererFeature —— URP 正统路径
一个完整的 RendererFeature 由两个类组成:
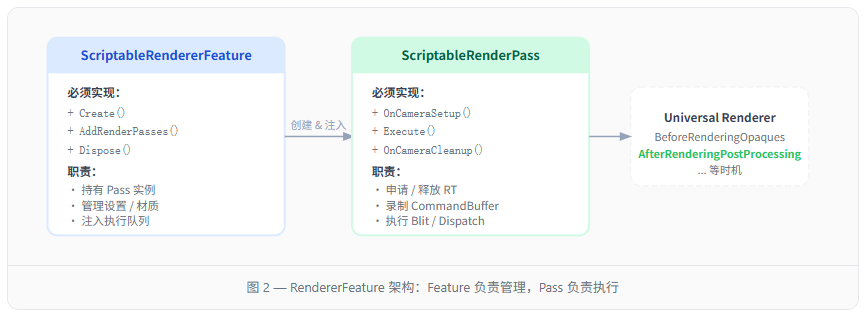
Pass 在 renderPassEvent 中指定执行时机。常用枚举值:
BeforeRendering
→
AfterRenderingOpaques
→
AfterRenderingTransparents
→
AfterRenderingPostProcessing
→
AfterRendering
后处理通常插在 AfterRenderingPostProcessing 之前,以参与 TAA/抖动之前的 HDR 图像。
4. 实现景深(Depth of Field)
景深的核心思路:以深度缓冲判断像素距焦点距离,远离焦点的区域做 CoC(Circle of Confusion)半径扩大,再执行分离式模糊。
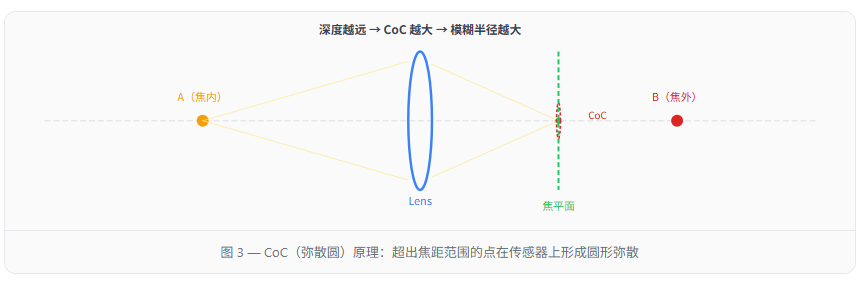
实现步骤
整个 DOF Pass 拆成三步:计算 CoC → 散景模糊 → 合成。
public override void Execute(ScriptableRenderContext ctx, ref RenderingData data)
{
    CommandBuffer cmd = CommandBufferPool.Get("DOF Pass");
    // ─── Step 1: 计算每像素 CoC(写入 r 通道)───
    cmd.SetGlobalFloat("_FocusDistance", _settings.focusDistance);
    cmd.SetGlobalFloat("_FocusRange",    _settings.focusRange);
    cmd.SetGlobalFloat("_BokehRadius",  _settings.bokehRadius);
    Blit(cmd, _colorHandle, _cocHandle,  _mat, /* Pass 0: CoC */ 0);
    // ─── Step 2: 散景模糊(分离式,减少采样次数)───
    cmd.SetGlobalTexture("_CoCTex", _cocHandle);
    Blit(cmd, _colorHandle, _blurH,    _mat, /* Pass 1: Bokeh-H */ 1);
    Blit(cmd, _blurH,       _blurV,    _mat, /* Pass 2: Bokeh-V */ 2);
    // ─── Step 3: 与原图按 CoC 合成 ───
    cmd.SetGlobalTexture("_BlurredTex", _blurV);
    Blit(cmd, _colorHandle, _colorHandle, _mat, /* Pass 3: Composite */ 3);
    ctx.ExecuteCommandBuffer(cmd);
    CommandBufferPool.Release(cmd);
}
// 把线性深度映射成 CoC 半径 [-1, 1]
// 负数 = 前景焦外,正数 = 背景焦外,0 = 焦内
half ComputeCoC(float rawDepth) {
    float d = LinearEyeDepth(rawDepth, _ZBufferParams);
    half  coc = (d - _FocusDistance) / _FocusRange;
    return clamp(coc, -1.0, 1.0) * _BokehRadius;
}
half4 FragCoC(Varyings i) : SV_Target {
    // _CameraDepthTexture 由 URP 自动绑定
    float depth = SAMPLE_DEPTH_TEXTURE(_CameraDepthTexture,
                      sampler_CameraDepthTexture, i.uv);
    half  coc   = ComputeCoC(depth);
    return half4(coc, coc, coc, 1.0);  // 仅用 r 通道
}
💡 性能提示散景模糊在半分辨率 RT 上执行可节省约 75% 填充率。合成时将模糊结果上采样回原分辨率,视觉损失微乎其微。
5. 实现 Bloom(泛光)
Bloom 的经典算法:提取高亮区域 → 多级下采样(构建 Mip 链)→ 逐级上采样(tent 滤波)→ 叠加原图。URP 内置的 Bloom Volume 组件就是这个思路,也可以完全自定义。
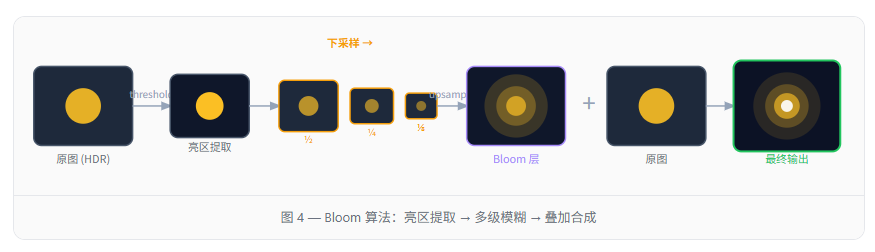
half4 FragPrefilter(Varyings i) : SV_Target {
    half4 color = SAMPLE_TEXTURE2D(_MainTex, sampler_MainTex, i.uv);
    // 膝部曲线:平滑截断,避免硬边闪烁
    half brightness = max(color.r, max(color.g, color.b));
    half rq = clamp(brightness - _Threshold + _Knee,
                 0.0, 2.0 * _Knee);
    rq = _Knee2 * rq * rq;  // _Knee2 = 0.25 / (knee + 1e-5)
    half w = max(rq, brightness - _Threshold) / max(brightness, 1e-5);
    return half4(color.rgb * w, 1.0);
}
// 3x3 Tent 滤波:加权 9 次采样,比双线性更平滑
half4 FragUpsample(Varyings i) : SV_Target {
    float2 texel = _BlitTexture_TexelSize.xy;
    half4 s = 0.0;
    // 权重:1/16 * [1 2 1 / 2 4 2 / 1 2 1]
    s += SAMPLE_TEXTURE2D(_BlitTexture, sampler_BlitTexture, i.uv + texel * float2(-1,-1)) * 0.0625;
    s += SAMPLE_TEXTURE2D(_BlitTexture, sampler_BlitTexture, i.uv + texel * float2( 0,-1)) * 0.125;
    s += SAMPLE_TEXTURE2D(_BlitTexture, sampler_BlitTexture, i.uv + texel * float2( 1,-1)) * 0.0625;
    s += SAMPLE_TEXTURE2D(_BlitTexture, sampler_BlitTexture, i.uv + texel * float2(-1, 0)) * 0.125;
    s += SAMPLE_TEXTURE2D(_BlitTexture, sampler_BlitTexture, i.uv + texel * float2( 0, 0)) * 0.25;
    s += SAMPLE_TEXTURE2D(_BlitTexture, sampler_BlitTexture, i.uv + texel * float2( 1, 0)) * 0.125;
    s += SAMPLE_TEXTURE2D(_BlitTexture, sampler_BlitTexture, i.uv + texel * float2(-1, 1)) * 0.0625;
    s += SAMPLE_TEXTURE2D(_BlitTexture, sampler_BlitTexture, i.uv + texel * float2( 0, 1)) * 0.125;
    s += SAMPLE_TEXTURE2D(_BlitTexture, sampler_BlitTexture, i.uv + texel * float2( 1, 1)) * 0.0625;
    return s;
}
using UnityEngine;
using UnityEngine.Rendering;
using UnityEngine.Rendering.Universal;
public class BloomFeature : ScriptableRendererFeature
{
    [System.Serializable]
    public class Settings
    {
        public Shader         shader;
        [Range(0f, 10f)] public float threshold = 1f;
        [Range(0f, 1f)]  public float knee      = 0.5f;
        [Range(0f, 5f)]  public float intensity  = 1f;
        [Range(1,  8)]   public int   iterations = 5;
    }
    public Settings settings = new();
    BloomPass _pass;
    public override void Create()
    {
        _pass = new BloomPass(settings);
        _pass.renderPassEvent = RenderPassEvent.BeforeRenderingPostProcessing;
    }
    public override void AddRenderPasses(ScriptableRenderer renderer, ref RenderingData data)
    {
        // 仅在 Game / Scene 摄像机执行,跳过反射探头等
        if (data.cameraData.cameraType != CameraType.Game) return;
        renderer.EnqueuePass(_pass);
    }
    protected override void Dispose(bool disposing)
        => _pass?.Dispose();
}
6. 实现色彩校正(Color Correction)
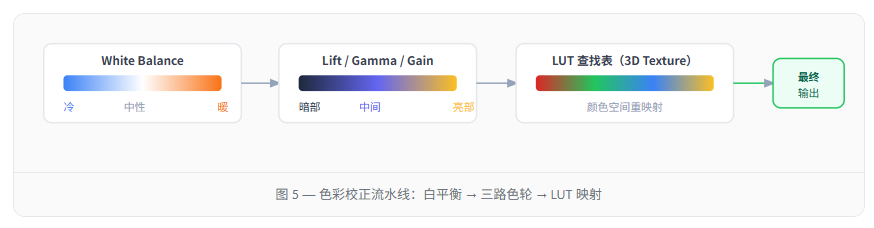
色彩校正通常在 Tonemapping 之后、最终 Blit 之前执行,包含三部分:White Balance(色温)→ Lift/Gamma/Gain(三路色轮)→ LUT 查找表映射。
// 色温调整:将 sRGB 转到 CIE XYZ,偏移色温,再转回
half3 WhiteBalance(half3 col, half temp, half tint) {
    // 简化版:直接在 LMS 颜色空间做乘法
    half3 lms = mul(LINEAR_2_LMS_MAT, col);
    lms *= half3(1.0 + temp * 0.1,      // 色温影响 L、M
               1.0 - temp * 0.05,
               1.0 + tint * 0.1);     // 色调影响 S
    return mul(LMS_2_LINEAR_MAT, lms);
}
// 三路色轮调色:暗部 Lift,中间调 Gamma,高光 Gain
half3 LiftGammaGain(half3 col,
                    half3 lift, half3 gamma, half3 gain) {
    col = col * (1.0 - lift) + lift;  // 暗部抬升
    col = col * gain;                   // 高光乘数
    return pow(max(0, col), 1.0 / gamma);// 中间调 Gamma
}
// _LUT: Texture3D,烘焙好的颜色空间映射
TEXTURE3D(_LUT); SAMPLER(sampler_LUT);
float _LUTSize;  // 通常 32
half3 ApplyLUT(half3 col) {
    // 将颜色映射到 [0.5/N, 1 - 0.5/N],避免边缘采样越界
    half  scale  = (_LUTSize - 1.0) / _LUTSize;
    half  offset = 0.5 / _LUTSize;
    half3 uvw    = col * scale + offset;
    return SAMPLE_TEXTURE3D(_LUT, sampler_LUT, uvw).rgb;
}
half4 FragColorGrade(Varyings i) : SV_Target {
    half4 col = SAMPLE_TEXTURE2D(_MainTex, sampler_MainTex, i.uv);
    col.rgb = WhiteBalance(col.rgb, _Temp, _Tint);
    col.rgb = LiftGammaGain(col.rgb, _Lift, _Gamma, _Gain);
    col.rgb = ApplyLUT(col.rgb);  // 最后做 LUT,覆盖所有调整
    return col;
}
📌 关于 LUT 生成LUT 可以在 DaVinci Resolve / Photoshop Camera Raw 中调出风格后导出 .cube 文件,再用 Unity 的 Create > Rendering > Custom Post Process 或自定义工具烘焙成 Texture3D Asset。
7. 性能优化与常见陷阱
7.1 RT 管理
public override void OnCameraSetup(CommandBuffer cmd, ref RenderingData data)
{
    var desc = data.cameraData.cameraTargetDescriptor;
    desc.depthBufferBits = 0;  // 后处理不需要深度写入
    desc.width  /= 2;         // 半分辨率降低填充率
    desc.height /= 2;
    RenderingUtils.ReAllocateIfNeeded(
        ref _halfRT, desc, FilterMode.Bilinear,
        name: "_HalfResBloom");
}
public override void OnCameraCleanup(CommandBuffer cmd)
{
    // 注意:RTHandle 在 Feature.Dispose() 里 Release,这里只解绑
    _halfRT = null;
}
7.2 常见陷阱一览
移动端高危陷阱
- 在 Tile-Based GPU(Mali/Adreno)上每次
Blit都触发 Load → Compute → Store,Pass 越多开销越高——合并 Pass - DOF 的 CoC 贴图不要用
RGBA32,用R8即可,省 4× 带宽 half精度在高动态范围 Bloom 阶段会发生饱和(溢出),请在 HDR RT 中保持half4(fp16),不要降到half3
URP API 常见错误
- URP 14+ 中
ConfigureTarget已弃用,改用SetRenderAttachment/SetRenderAttachmentDepth - 在
AddRenderPasses之外调用ConfigureInput无效——必须在AddRenderPasses里调 Blitter.BlitCameraTexture(URP 14+)替代了老式cmd.Blit,可以正确处理 y-flip
优化建议
- Bloom 迭代次数 ≤ 5,在低端机上自动减少到 3(按
SystemInfo.graphicsMemorySize判断) - DOF 在场景无深度变化帧跳过 CoC Pass(深度 dirty flag)
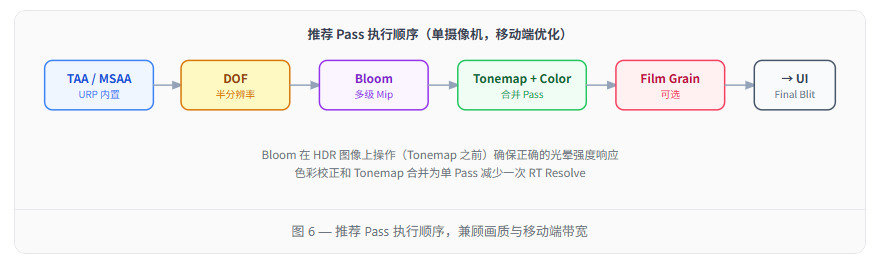
- 色彩校正+Tonemapping 合并成单 Pass,所有调整在一个 Fragment Shader 里完成
- LUT 尺寸优先用 32³(32×32×32):质量与性能最优平衡点


 扫一扫
扫一扫


 1万+
1万+

 被折叠的 条评论
为什么被折叠?
被折叠的 条评论
为什么被折叠?
 到【灌水乐园】发言


