

A spinner loader is used to indicate that a process is in progress, such as fetching data or loading content. In Next.js, you can easily add a spinner loader using the react-loader-spinner package.
Approach
To add a spinner loader in a Next.js application, we are going to use the react-loader-spinner package. This package provides different types of animated loaders that can be easily integrated into any page. First, install the package, then import the required loader component and display it inside your page.
Steps to Add Spinner Loader in Next.js
Prerequisite: Before following this tutorial, make sure you have already created a Next.js project. If not, refer to the Next.js Installation and First Application article.
Step 1: Install the required package
Now we will install the react-loader-spinner package using the below command:
npm install react-loader-spinnerProject Structure
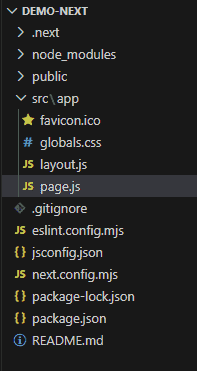
Step 2: Add the Spinner Loader
Open the src/app/page.js file and add the following code.
// File Path: src/app/page.js
"use client";
import { Puff } from "react-loader-spinner";
export default function Home() {
    return (
        <main
            style={{
                display: "flex",
                flexDirection: "column",
                justifyContent: "center",
                alignItems: "center",
                minHeight: "100vh",
                gap: "20px",
            }}
        >
            <h2>
                Next.js Spinner Loader -
                GeeksforGeeks
            </h2>
            <Puff
                height="100"
                width="100"
                color="#00BFFF"
                ariaLabel="loading"
            />
        </main>
    );
}
Explanation: Here, we first import the Puff loader component from the installed package. Then, we render the loader inside the page. The height, width, and color properties are used to customize the appearance of the spinner loader.
Step 3: Run the application
Run the below command in the terminal to run the app.
npm run dev