

An Image Carousel is used to display multiple images in a sliding view. In Next.js, you can easily create an Image Carousel using the react-responsive-carousel package.
Approach
To create an image carousel in Next.js, we are going to use the react-responsive-carousel package because it is lightweight and easy to use. Install the package, import the Carousel component, and then display the required images inside the Carousel component.
Steps to Create Carousel in Next.js
Prerequisite: Before following this tutorial, make sure you have already created a Next.js project. If not, refer to the Next.js Installation and First Application article.
Step 1: Install the react-responsive-carousel package using the below command
npm install react-responsive-carouselStep 2: Create an images folder inside the public directory and place the images that you want to display inside the carousel.
Project Structure:
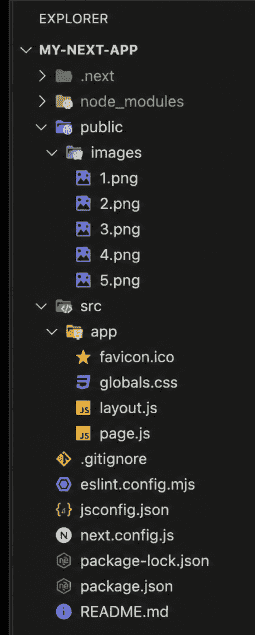
Step 3: Creating Image Carousel:
Open the src/app/page.js file and add the following code.
// File Path: src/app/page.js
"use client";
import Image from "next/image";
import { Carousel } from "react-responsive-carousel";
import "react-responsive-carousel/lib/styles/carousel.min.css";
export default function Home() {
    return (
        <main>
            <h2>Next.js Carousel - GeeksforGeeks</h2>
            <Carousel
                showThumbs={false}
                autoPlay
                infiniteLoop
                interval={3000}>
                <div>
                    <Image
                        src="/images/1.png"
                        alt="Image 1"
                        width={800}
                        height={400}
                    />
                    <p className="legend">Image 1</p>
                </div>
                <div>
                    <Image
                        src="/images/2.png"
                        alt="Image 2"
                        width={800}
                        height={400}
                    />
                    <p className="legend">Image 2</p>
                </div>
                <div>
                    <Image
                        src="/images/3.png"
                        alt="Image 3"
                        width={800}
                        height={400}
                    />
                    <p className="legend">Image 3</p>
                </div>

                <div>
                    <Image
                        src="/images/4.png"
                        alt="Image 4"
                        width={800}
                        height={400}
                    />
                    <p className="legend">Image 4</p>
                </div>
                <div>
                    <Image
                        src="/images/5.png"
                        alt="Image 5"
                        width={800}
                        height={400}
                    />
                    <p className="legend">Image 5</p>
                </div>
            </Carousel>
        </main>
    );
}
In the above example, we first import the Carousel component and its stylesheet from the installed package. Then we import the Image component from Next.js and display the images stored inside the public/images folder. The Carousel component automatically displays the images as a responsive image slider.
Step 4: Run the application: Run the below command in the terminal to run the app.
npm run devOutput:
