



 本文详细分析了Bochs模拟器对于into和bound指令的实现过程。into指令通过检查OF标志位触发溢出异常,而bound指令则在越界时引发#BR异常。异常处理通过exception函数进行,并利用longjmp指令返回到cpu_loop,以便于调试器接管或处理嵌套的fault。
前言
在《x86/x64体系探索及编程》的ex10-7代码中,使用了int3,bound,into来加载CS寄存器。我们现在来尝试分析bochs对于这几条指令的实现。
into指令分析
关于into以及处理OF异常的代码如下,比较好理解。into指令只是判断eflag的of位,这位标志着是否存在溢出发生,如果存在溢出,则触发OF异常。
;; 测试 INTO 指令
        mov eax, 0x80000000
        mov ebx, eax
        add eax, ebx                                        ; 产生溢出,OF标志置位
        into                                                ; 引发 #OF 异常


;---------------------------------------
; OF_handler(): #OF handler
;---------------------------------------
OF_handler:
        jmp do_OF_handler
omsg1   db '---> Now, enter #OF handler',10, 10,0

do_OF_handler:
        push ebx
        mov ebx, [esp + 12]             ; 读 eflags 值
        mov esi, omsg1
        call puts
        mov esi, ebx
        call dump_flags_value
        pop ebx
        iret
Intel手册中对于INTO指令的描述非常简单,只是注意这是一个trap类型,而不是fault类型,我们之后会看细节,看看两种类型的实际区别,这里简单来讲,trap类型执行完后不会再来执行原指令,而fault则会再来执行原指令,int主动调用的都为trap类型。

我们现在来用IDA逆向代码,确定其位置,然后用bochs定位,最后用visual studio看源码。
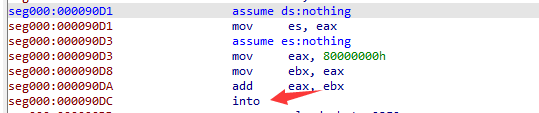
如下bochs对于into指令的模拟代码,内容如下,这部分其实一点也不难。其基本就是调用get_OF()来判断标志位,如果满足要求的话,触发0x4号中断(overflow)。
void BX_CPP_AttrRegparmN(1) BX_CPU_C::INTO(bxInstruction_c *i)
{
  if (get_OF()) {
    BX_INSTR_FAR_BRANCH_ORIGIN();

    .....
    // interrupt is not RSP safe
    interrupt(4, BX_SOFTWARE_EXCEPTION, 0, 0);

    BX_INSTR_FAR_BRANCH(BX_CPU_ID, BX_INSTR_IS_INT,
                        FAR_BRANCH_PREV_CS, FAR_BRANCH_PREV_RIP,
                        BX_CPU_THIS_PTR sregs[BX_SEG_REG_CS].selector.value, RIP);
  }

  BX_NEXT_TRACE(i);
}
bound指令分析
#BR异常应该含义是 bad range,越界引发的,该代码就是来触发#BR异常。
;; 测试 bound 指令
        mov eax, 0x8000                                    ; 这个值将越界
        bound eax, [bound_rang]                            ; 引发 #BR 异常

;-------------------------------------
; BR_handler(): #BR handler
;-------------------------------------
BR_handler:
        jmp do_BR_handler
brmsg1        db 10, 10, '---> Now, enter #BR handler', 10, 0
do_BR_handler:
        mov esi, brmsg1
        call puts
        mov eax, [bound_rang]                ; 修复错误
        iret

bound_rang        dd        10000h              ; 给定的范围是 10000h 到 20000h
                  dd        20000h
我们现在来使用IDA,逆向这部分代码,如下图所示。

其代码总体来说是比较简单的,来获取大小值,之后来进行判断,如果越界则调用 exception(BX_BR_EXCEPTION, 0) 函数来触发异常。
void BX_CPP_AttrRegparmN(1) BX_CPU_C::BOUND_GdMa(bxInstruction_c *i)
{
  Bit32s op1_32 = BX_READ_32BIT_REG(i->dst());

  Bit32u eaddr = (Bit32u) BX_CPU_RESOLVE_ADDR_32(i);

  Bit32s bound_min = (Bit32s) read_virtual_dword_32(i->seg(), eaddr);
  Bit32s bound_max = (Bit32s) read_virtual_dword_32(i->seg(), (eaddr+4) & i->asize_mask());

  if (op1_32 < bound_min || op1_32 > bound_max) {
    BX_DEBUG(("%s: fails bounds test", i->getIaOpcodeNameShort()));
    exception(BX_BR_EXCEPTION, 0);
  }

  BX_NEXT_INSTR(i);
}
这个 exception(BX_BR_EXCEPTION, 0) 函数来触发异常,异常之后必须被对应的中断所响应,而在这里填写中断所相应的信息,其中重要部分如下所示,填写errocode之类的,之后调用interrupt(...)函数,这个函数我们已经留意很多次了,不过多叙述了。
// vector:     0..255: vector in IDT
// error_code: if exception generates and error, push this error code
void BX_CPU_C::exception(unsigned vector, Bit16u error_code)
{
    ....
 if (vector < BX_CPU_HANDLED_EXCEPTIONS) {
     push_error = exceptions_info[vector].push_error;
     exception_class = exceptions_info[vector].exception_class;
     exception_type = exceptions_info[vector].exception_type;
  }
    ....
 interrupt(vector, BX_HARDWARE_EXCEPTION, push_error, error_code);

 longjmp(BX_CPU_THIS_PTR jmp_buf_env, 1); // go back to main decode loop
    ....
}

struct BxExceptionInfo {
  unsigned exception_type;
  unsigned exception_class;
  bx_bool push_error;
};


struct BxExceptionInfo exceptions_info[BX_CPU_HANDLED_EXCEPTIONS] = {
  /* DE */ { BX_ET_CONTRIBUTORY, BX_EXCEPTION_CLASS_FAULT, 0 },
  /* DB */ { BX_ET_BENIGN,       BX_EXCEPTION_CLASS_FAULT, 0 },
  /* 02 */ { BX_ET_BENIGN,       BX_EXCEPTION_CLASS_FAULT, 0 }, // NMI
  /* BP */ { BX_ET_BENIGN,       BX_EXCEPTION_CLASS_TRAP,  0 },
}
上述代码中一定要注意其返回方式,其不是用return返回的,而是使用一个longjmp(...)指令(这个longjmp指令记得在前面描述过,这里不过多叙述)。其返回到cpu_loop( )函数开头,代码如下:
void BX_CPU_C::cpu_loop(void)
{
#if BX_DEBUGGER
  BX_CPU_THIS_PTR break_point = 0;
  BX_CPU_THIS_PTR magic_break = 0;
  BX_CPU_THIS_PTR stop_reason = STOP_NO_REASON;
#endif

  // If the exception() routine has encountered a nasty fault scenario,
  // the debugger may request that control is returned to it so that
  // the situation may be examined.
#if BX_DEBUGGER
  if (bx_guard.interrupt_requested) return;
#endif

  if (setjmp(BX_CPU_THIS_PTR jmp_buf_env)) { < --- 从这里出来
    // can get here only from exception function or VMEXIT
    BX_CPU_THIS_PTR icount++;
    BX_SYNC_TIME_IF_SINGLE_PROCESSOR(0);
  }

     // We get here either by a normal function call, or by a longjmp
     // back from an exception() call.  In either case, commit the
     // new EIP/ESP, and set up other environmental fields.  This code
     // mirrors similar code below, after the interrupt() call.
      BX_CPU_THIS_PTR prev_rip = RIP; // commit new EIP
      BX_CPU_THIS_PTR speculative_rsp = 0;


    ....
    ....
    while(1){
        for(;;){
        ...
        i1->execute(...) // 我们从这里进去执行指令的
        ...
        }
    }
}
其为什么这么走现在还看不太出来,之后我们会有单独分析exception的环节,看代码注释,合理怀疑:如果遇到嵌套的fault,此时就需要bochs的调试器接管代码,因此需要预先跳出cpu循环。
总结
这篇文章就简单分析了这两个指令,该两个指令本身没什么难度。但是我们了解了exception(..)这个函数,异常都会走exception(..)中,然后通过longjmp(...)函数来跳转到cpu之外,之后随着我们深入分析,对其细节把握会更加深刻。


 扫一扫
扫一扫


 2879
2879

 被折叠的 条评论
为什么被折叠?
被折叠的 条评论
为什么被折叠?
 到【灌水乐园】发言


