


前言
webservice接口:
Web 是使应用程序可以与平台和编程语言无关的方式进行相互通信的一项技术。Web 服务是一个软件接口,它描述了一组可以在网络上通过标准化的 XML 消息传递访问的操作。它使用基于 XML 语言的协议来描述要执行的操作或者要与另一个 Web 服务交换的数据。一组以这种方式交互的 Web 服务在面向服务的体系结构(Service-Oriented Architecture,SOA)中定义了特殊的 Web 服务应用程序。
简单的说WebService是一个SOA(面向服务的编程)的架构,它是不依赖于语言,不依赖于平台,可以实现不同的语言(通过 xml 描述)间的相互调用,通过Internet进行基于Http协议的网络应用间的交互。通过SOAP在Web上提供的软件服务,使用WSDL文件进行说明,并通过UDDI进行注册。
XML:(Extensible Markup Language)扩展型可标记语言。面向短期的临时数据处理、面向万维网络,是Soap的基础。
Soap:(Simple Object Access Protocol)简单对象存取协议。是XML Web Service 的通信协议。当用户通过UDDI找到你的WSDL描述文档后,他通过可以SOAP调用你建立的Web服务中的一个或多个操作。SOAP是XML文档形式的调用方法的规范,它可以支持不同的底层接口,像HTTP(S)或者SMTP。
WSDL:(Web Services Description Language) WSDL 文件是一个 XML 文档,用于说明一组 SOAP 消息以及如何交换这些消息。大多数情况下由软件自动生成和使用。
HTTP接口:
Http协议是建立在TCP协议基础之上的,当浏览器需要从服务器获取网页数据的时候,会发出一次Http请求。Http会通过TCP建立起一个到服务器的连接通道,当本次请求需要的数据完毕后,Http会立即将TCP连接断开,这个过程是很短的。所以Http连接是一种短连接,是一种无状态的连接。
HTTP协议的主要特点可概括如下:
1.支持客户/服务器模式。
2.简单快速:客户向服务器请求服务时,只需传送请求方法和路径。请求方法常用的有GET、HEAD、POST。每种方法规定了客户与服务器联系的类型不同。由于HTTP协议简单,使得HTTP服务器的程序规模小,因而通信速度很快。
3.灵活:HTTP允许传输任意类型的数据对象。正在传输的类型由Content-Type加以标记。
4.无连接:无连接的含义是限制每次连接只处理一个请求。服务器处理完客户的请求,并收到客户的应答后,即断开连接。采用这种方式可以节省传输时间。
5.无状态:HTTP协议是无状态协议。无状态是指协议对于事务处理没有记忆能力。缺少状态意味着如果后续处理需要前面的信息,则它必须重传,这样可能导致每次连接传送的数据量增大。另一方面,在服务器不需要先前信息时它的应答就较快。
URL解析
在WWW上,每一信息资源都有统一的且在网上唯一的地址,该地址就叫URL(Uniform Resource Locator,统一资源定位符),它是WWW的统一资源定位标志,就是指网络地址。HTTP协议工作于客户端-服务端架构之上。浏览器作为HTTP客户端通过URL向HTTP服务端即WEB服务器发送所有请求。Web服务器根据接收到的请求后,向客户端发送响应信息。
URL由三部分组成:资源类型、存放资源的主机域名、资源文件名。

总结:
http接口走http协议,通过路径来区分调用方法,请求报文一般是key-value形式的,返回报文一般是json串,常用的是get和post方法来请求。
webservice接口走的soap协议,通过http传输,请求报文和返回报文都是xml格式的。
正文
今天的主题是webservice接口的开发及发布,所以http接口在这就不进行演示了。
首先,创建一个springboot的项目,这里就不进行创建了,要是有不会的可以看看这篇文章。(springboot项目的创建)今天的这个webservice接口主要业务为:
- 查询表中的数据,将表中的数据返回给页面或者以xml(String)的形式返回
- 将图片转成Base64字符串
接下来,打开pom.xml文件,添加以下信息:
<!-- https://mvnrepository.com/artifact/org.apache.cxf/cxf-spring-boot-starter-jaxws -->
<dependency>
    <groupId>org.apache.cxf</groupId>
    <artifactId>cxf-spring-boot-starter-jaxws</artifactId>
    <version>3.2.5</version>
</dependency>
所需要的jar包有如下:

创建实体类:
@Data
public class FileInfo implements Serializable {

    private String sourceid ;

    private String content;
}
创建DAO类:
@Repository
public interface FileInfoDao {

    @Select("select * from dwd_mat_fileinfo WHERE SOURCEID= #{sourceId}")
    public FileInfo  findFileInfoList(String sourceId);
}
创建Service接口:
@WebService(name="fileInfoService", targetNamespace="http://service.demo.example.com/")
@WSDLDocumentationCollection( {
@WSDLDocumentation(value = "<!-- 待办审批图片查询 -->",
placement = WSDLDocumentation.Placement.TOP)
}
)
public interface FileInfoService {
FileInfo getSourceId(String sourceId);
/**
* img图片转Base64字符串
* @param xml
* @return
* @throws Exception
*/
@WSDLDocumentation("待办审批图片查询接口,参数为xml格式的字符串,返回值为xml格式字符串;"
+ "参数示例:<source>来源系统(String字符串)</source>")
public FileInfo unifyFileQueryImgBase64Interface(@WebParam(name="xml") String xml)
throws Exception;
}
创建service实现类:
@Service
@Component
@WebService(serviceName="fileInfoService",
        targetNamespace="http://service.demo.example.com/",
        endpointInterface="com.example.demo.service.FileInfoService")
public class FileInfoServiceImpl implements FileInfoService {

    /**
     * 注入保存图片的路径
     */
    @Value("${path}")
    private String path;

    @Autowired
    private FileInfoDao fileInfoDao;

    @Override
    public FileInfo getSourceId(String sourceId){
        FileInfo fileInfo = fileInfoDao.findFileInfoList(sourceId);
        return fileInfo;
    }

    @Override
    public FileInfo unifyFileQueryImgBase64Interface(String xml) throws Exception {
        FileInfo fileInfoResult = null;
        if(!Strings.isNullOrEmpty(xml)){
            //xml转换Map<String,Object>
            List<Map<String, Object>> xmlFrom = XmlFormatConvertMap.getXmlFromString(xml);
            Map<String, Object> mapXml = xmlFrom.get(0);
            if(!mapXml.isEmpty()){
                FileInfo fileinfo = fileInfoDao.findFileInfoList((String)mapXml.get("sourceId"));
                if(!StringUtils.isEmpty(fileinfo)){
                    //不为空则去转换,否则直接返回
                    fileInfoResult = convert(fileinfo);
                }
            }
        }
        return fileInfoResult;
    }

    /**
     * 图片转Base64字符串
     * @param fileInfo
     * @return
     */
    private FileInfo convert(FileInfo fileInfo){
        FileInfo fileInfoResult = null;
        if(!StringUtils.isEmpty(fileInfo)){
            fileInfoResult = new FileInfo();
            if(!Strings.isNullOrEmpty(fileInfo.getContent())){
                //转换器
                String covertBase64 = imgConvertBase64(fileInfo.getContent());
                fileInfoResult.setContent(covertBase64);
            }
            fileInfoResult.setSourceid(fileInfo.getSourceid());
        }
        return fileInfoResult;
    }

    /**
     * 转换工具
     * @param imgStr
     * @return
     */
    private String imgConvertBase64(String imgStr){
        if (imgStr == null) {
            return null;
        }
        String imageStr = null;
        try {
            BASE64Decoder decoder = new BASE64Decoder();
            // 解密
            byte[] b = decoder.decodeBuffer(imgStr);
            // 处理数据
            for(int i = 0; i < b.length; ++i) {
                if (b[i] < 0) {
                    b[i] += 256;
                }
            }
            //从配置文件加载图片保存路径
            String filePath = path+System.currentTimeMillis()+".png";
            File file = new File(filePath);
            OutputStream out = new FileOutputStream(String.valueOf(file));
            out.write(b);
            out.flush();
            out.close();
            //保存完毕之后进行转换
            imageStr = getImageStr(file);
        } catch (IOException e) {
            e.printStackTrace();
        }
        return imageStr;
    }

    /**
     * 把图片转换成base64字符串
     * @param file
     * @return
     */
    private String getImageStr(File file){
        //在把图片进行转码
        InputStream inputStream = null;
        byte[] data = null;
        String imageStr = null;
        try {
            inputStream = new FileInputStream(file);
            data = new byte[inputStream.available()];
            inputStream.read(data);
            inputStream.close();
            imageStr = new String(Base64.getEncoder().encode(data));
        } catch (IOException e) {
            e.printStackTrace();
        }
        return imageStr;
    }
}
创建Controller接口:
@RestController
public class FileInfoController {

    @Autowired
    private FileInfoService fileInfoService;

    @RequestMapping("/getSourceId")
    public FileInfo getFileInfo(String sourceId){
        FileInfo fileInfo = null;
        if(null != sourceId && "".equals(sourceId)){
            fileInfo = fileInfoService.getSourceId(sourceId);
        }
        return fileInfo;
    }
}
CxfConfig类的创建:
@Configuration
public class CxfConfig {

    @Autowired
    private Bus bus;

    @Autowired
    private FileInfoService fileService;

    @Bean
    public ServletRegistrationBean dispatcherServlet() {
        return new ServletRegistrationBean(new CXFServlet(), "/service/*");
    }

    @Bean(name = Bus.DEFAULT_BUS_ID)
    public SpringBus springBus() {
        return new SpringBus();
    }

    @Bean
    public Endpoint fileInfoServiceEndpoint() {
        EndpointImpl endpoint = new EndpointImpl(bus, fileService);
        endpoint.publish("/fileInfoService");
        return endpoint;
    }
}
XmlFormatConvertMap类的创建:
/**
     * 字符串xml解析
     * @param xml
     * @return
     */
	@SuppressWarnings("unchecked")
	public static List<Map<String, Object>> getXmlFromString(String xml) {

		List<Map<String, Object>> list = new ArrayList<Map<String,Object>>();
        try {
			Document document = DocumentHelper.parseText(xml);
			Element element = document.getRootElement();

			Iterator<Element> iterator = element.elementIterator();
			while(iterator.hasNext()){
				Element e = iterator.next();
				Map<String,Object> map= getNodeMap(e);
				list.add(map);
			}
		} catch (DocumentException e) {
			e.printStackTrace();
		}
		return list;

	}

	@SuppressWarnings("unchecked")
	public static  Map<String, Object> getNodeMap(Element node) {
		List<Element> listAttributes = node.elements();
		Map<String, Object> map = new HashMap<String, Object>();
		for(Element att:listAttributes){
			map.put(att.getName(), att.getText().trim());
		}
		return map;
	}

	/**
	 * key值驼峰命名的替换
	 * @param map
	 * @return
	 * @throws Exception
	 */
	public static Map<String, Object> coventKey(Map<String, Object> map) throws Exception {
		Map<String, Object> conMap = new HashMap<String, Object>();
		if(!map.isEmpty()){
			for(Entry<String, Object> entryMap : map.entrySet()){
				conMap.put(entryMap.getKey().toLowerCase(), entryMap.getValue());
			}
		}
		return conMap;
	}
}
配置文件的添加(application.properties):
#设置图片保存地址  如:D:\\xxxx\\aaa\\12345.png
path=D:\\images\\

#数据源URL
spring.datasource.url=jdbc:mysql://localhost:3306/imap?serverTimezone=GMT%2b8
#数据源用户名
spring.datasource.username=yfzx
#数据源密码
spring.datasource.password=yfzx@1234
#数据源驱动
spring.datasource.driver-class-name=com.mysql.jdbc.Driver
代码到了这里就基本结束了,很多人在启动之后会发现,webservice接口可以调通,但是http接口却无法使用了,一下代码就是为了解决这个问题,添加在启动类中。
@SpringBootApplication
public class SpringBootWebserviceApplication {

	public static void main(String[] args) {
		SpringApplication.run(SpringBootWebserviceApplication.class, args);
		System.out.println("启动成功!");
	}

	@Bean
	public ServletRegistrationBean restServlet(){
		//注解扫描上下文
		AnnotationConfigWebApplicationContext applicationContext = new AnnotationConfigWebApplicationContext();
		//项目包名
		applicationContext.scan("com.example.demo");
		DispatcherServlet rest_dispatcherServlet = new DispatcherServlet(applicationContext);
		ServletRegistrationBean registrationBean = new ServletRegistrationBean(rest_dispatcherServlet);
		registrationBean.setLoadOnStartup(1);
		registrationBean.addUrlMappings("/*");
		return registrationBean;
	}

}
接下来启动该项目。

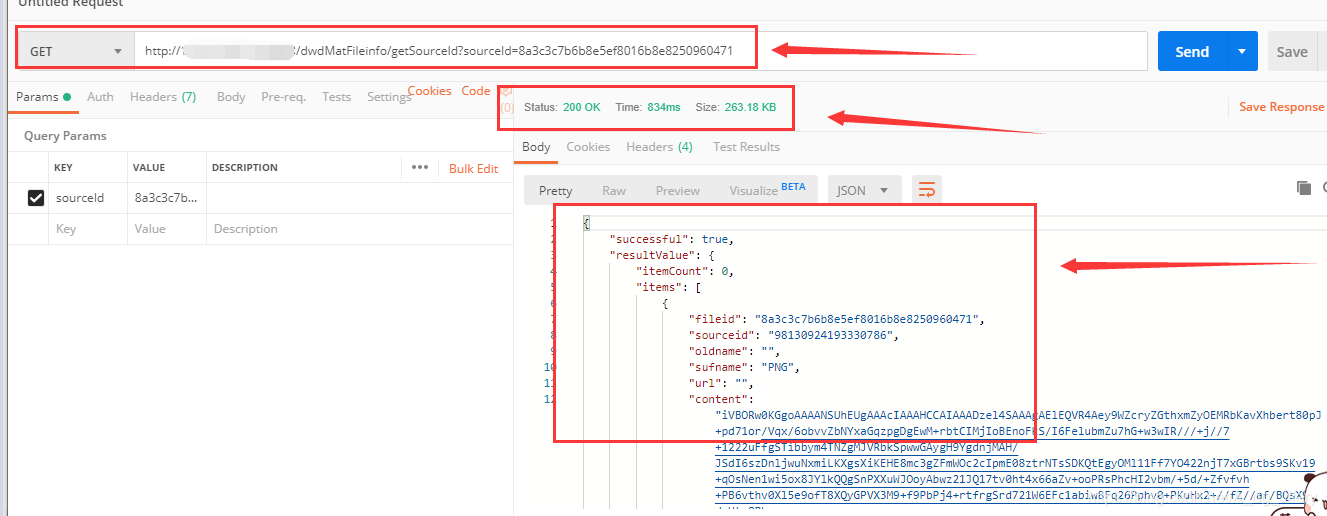
利用postman测试http接口:
利用SoapUI测试webservice接口:
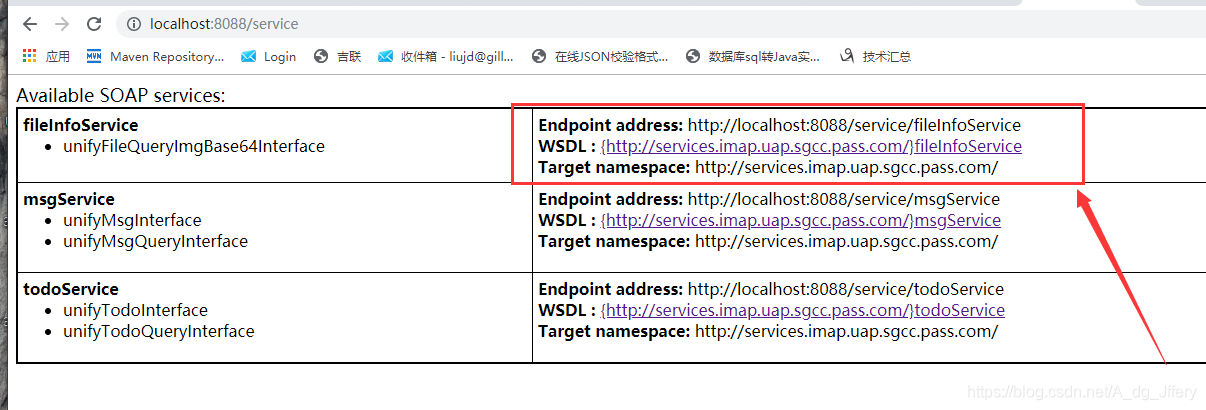
- 首先访问如下地址,得到wsdl地址:
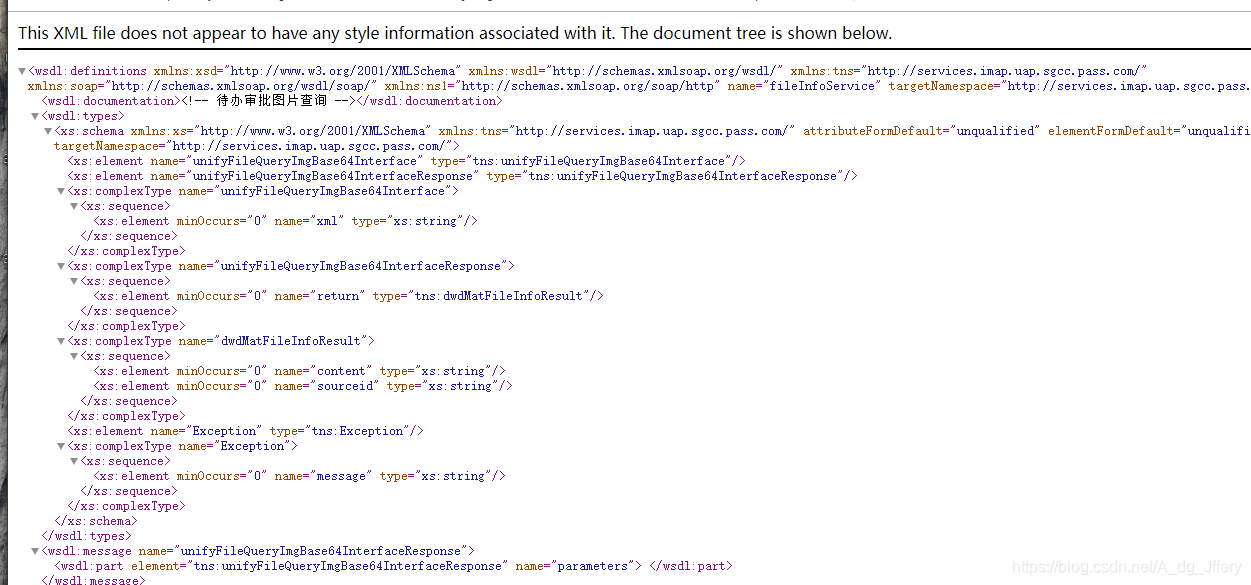
- 然后点击相对应得wsdl,得到如下信息:
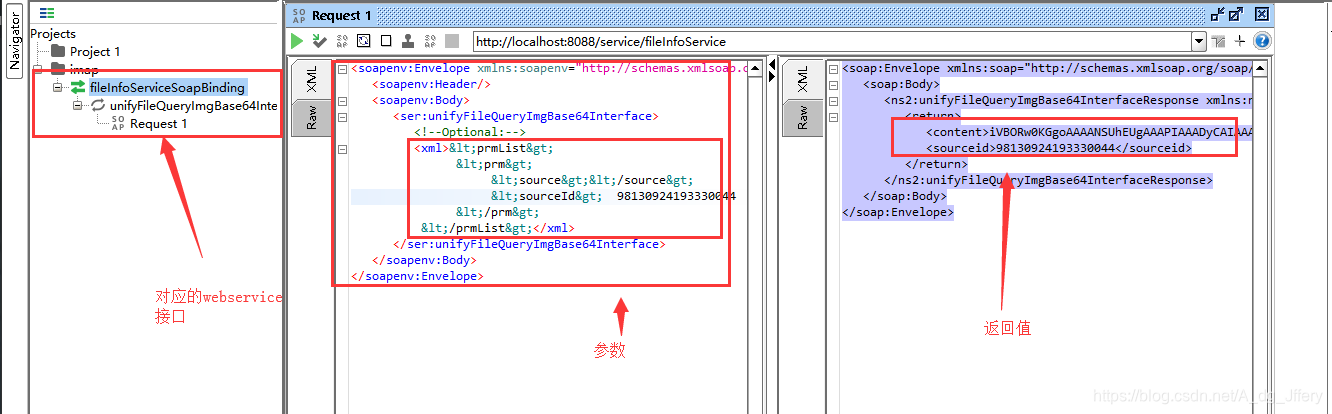
- 开始测试:
结束语:
文章到了此处就结束了,如果大家在查看的过程当中发现错误了,请及时反馈,小编会抽时间进行修改,请大家多多指教!

 1004
1004


 扫一扫
扫一扫


 被折叠的 条评论
为什么被折叠?
被折叠的 条评论
为什么被折叠?
 到【灌水乐园】发言


